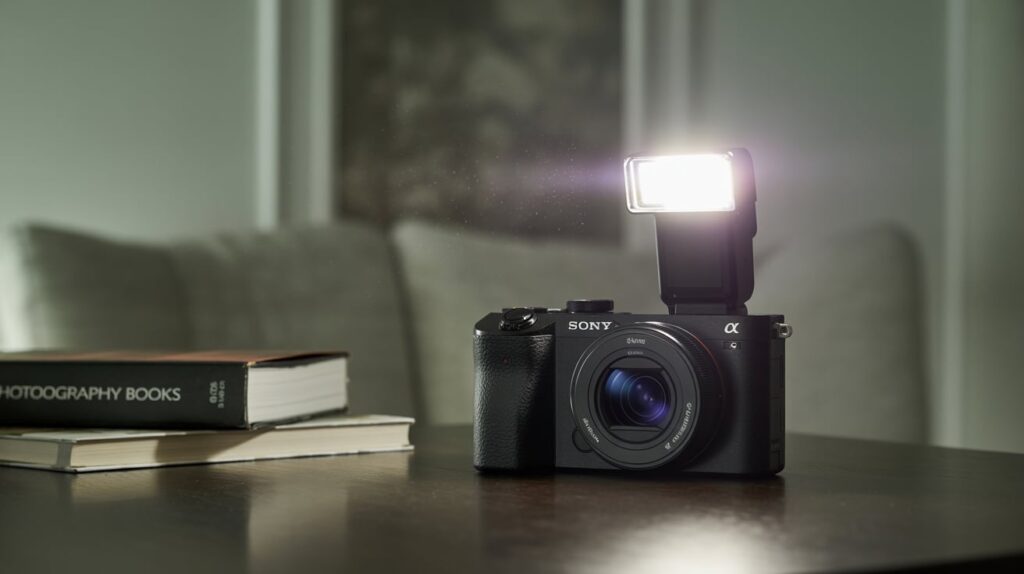
How to Use the Flash on Sony NEX-6 – A Simple Guide!
If you’re wondering how to use flash on the Sony NEX-6, this guide will walk you through everything step by step. The NEX-6 has a built-in flash and supports many external flashes, giving you great control over lighting. You’ll learn how to activate the flash, choose the right flash mode (like Auto, Fill, or Slow Sync), and avoid overexposed shots.
This article also explains how to use an external flash for better lighting and how to set up wireless off-camera flash. We compare built-in vs external flash and list the best compatible flash models. Whether you’re shooting indoors, at night, or outdoors in bright light, this guide helps you take brighter, clearer photos with your NEX-6.
Understanding Flash Modes on the NEX-6 – Explore Flash Modes!
The Sony NEX-6 has different flash modes to help you take better photos in different lighting. Auto Flash is a smart setting that works in iAuto and some scene modes. It fires the flash only when the camera thinks it’s too dark. This is helpful for beginners who don’t want to worry about manual settings.
Fill-Flash Mode is used when you want the flash to fire every time, even if it’s bright outside. It helps brighten dark areas like shadows under hats or around the eyes. The shutter speed usually stays at 1/60 or 1/100 second. For more control, Manual Flash lets you adjust the flash power yourself. This is useful when you want to set the perfect lighting for your photo.
Activating the Built-in Flash on Sony NEX-6 – Step-by-Step!
Locate the Flash Button
Look at the back of your Sony NEX-6, near the top-left corner. You’ll see a small button marked with a lightning bolt symbol (⚡), which is the flash release button.
Press the Flash Button
Gently press the flash button to pop up the built-in flash. It will rise from the top of the camera and stay up until you push it back down manually.
Choose a Flash Mode from the Menu
Press the MENU button and scroll to the camera settings. Select Flash Mode, then choose from options like Auto Flash, Fill-Flash, or Manual Flash depending on your scene.
Wait for the Flash to Charge
Once the flash is up, look for the flash icon on the screen. If it’s blinking, the flash is still charging. Wait until the icon turns steady before taking a photo.
Take Your Photo with Flash
When the flash is ready, press the shutter button to take your shot. The flash will fire based on the mode you selected, helping brighten your subject.
Close the Flash After Shooting
When you’re done, gently push the flash head back down into place. This will protect the flash and prepare the camera for storage or the next use.
Best Flash Settings for Sony NEX-6 Photography – Find Optimal Settings!
Using the right flash setting can make your photos look much better. The Sony NEX-6 gives you a few flash modes to choose from, and each one is good for different situations.For everyday use, Auto Flash is great. The camera decides when to use flash, which is helpful if you’re just starting out.

When you’re outside and there are strong shadows, try Fill-Flash. It will add light to faces and dark areas, even if it’s sunny.If you want more control, use Manual Flash. You can choose how strong the flash is. This is good for portraits or indoor shoots where you need to control the light.Also, try changing Flash Compensation if your photo is too bright or too dark. It lets you make the flash stronger or weaker.
Sony NEX-6 Flash Modes Explained – Auto, Fill, Rear Sync & More!
The Sony NEX-6 offers several flash modes to help you capture great photos in different situations. Here’s a breakdown of the most common modes:
- Auto Flash
This mode automatically decides when to use the flash. It’s perfect for everyday photography, where the camera will fire the flash when it detects low light. - Fill-Flash
In Fill-Flash mode, the flash fires every time, even if it’s bright outside. This helps fill in shadows on your subject, like under their eyes or hats, for more balanced lighting. - Rear Sync Flash
Rear Sync fires the flash just before the camera’s shutter closes, creating a cool effect with moving subjects. It’s often used for shots where you want the subject to appear sharp while showing motion behind them, like someone walking at night. - Slow Sync Flash
This mode uses a slower shutter speed along with the flash. It helps to light up your subject while also capturing more of the background in low light. It’s great for situations where you want both the person or object in front of you and the background to be well-lit. - Manual Flash
Manual Flash lets you control the power of the flash. This gives you more control over the light in your photo, which is great for creative shots or portraits.
Each of these flash modes has a specific use depending on the lighting conditions and the effect you want in your photos.
Using External Flash with Sony NEX-6 – What You Need to Know!
You can use an external flash with the Sony NEX-6 to get more powerful and customizable lighting. To connect the external flash, just attach it to the camera’s hot shoe on the top of the camera. Once it’s on, you can adjust the settings on the flash to control the light output, angle, and more.

An external flash is helpful in situations where the built-in flash isn’t strong enough, like in large rooms or outdoor settings. It also gives you more control over the lighting, so you can create better photos, especially for portraits or action shots.
Tips for Avoiding Overexposed Shots with Sony NEX-6 Flash – Balance Your Light!
- Adjust Flash Power: Lower the flash output using Flash Compensation to reduce the brightness in your photos. This helps prevent the flash from overpowering your subject, especially in close-up shots.
- Increase Shutter Speed: A faster shutter speed reduces the exposure time, which can help limit the amount of light hitting the sensor. This is a useful trick to balance the flash with natural light.
- Use Flash at a Distance: Don’t position the flash too close to your subject. When you’re too close, the light may become too harsh, leading to overexposure and unwanted glare.
- Check Exposure Settings: Make sure your ISO, aperture, and shutter speed are balanced with the flash. A high ISO or wide aperture might cause your photos to be overexposed, even with the flash.
- Use Diffusers or Bounce the Flash: Instead of pointing the flash directly at the subject, use a diffuser or bounce the flash off a nearby surface like a ceiling or wall to soften the light. This helps create more even and natural lighting.
How to Trigger Off-Camera Flash Wirelessly on Sony NEX-6? – Set Up Wirelessly!
To trigger an off-camera flash wirelessly with the Sony NEX-6, you need to use an external flash with wireless controller capability, as the built-in flash on the NEX-6 cannot act as a wireless commander.

Step-by-Step Guide:
- Attach a compatible Sony flash (such as HVL-F20M, HVL-F60M, HVL-F43M, HVL-F20AM, HVL-F58AM, or HVL-F43AM) with wireless controller function to the camera’s hot shoe.
- Turn on both the camera and the attached flash.
- Set the camera to one of the following modes: Program (P), Aperture Priority (A), Shutter Priority (S), or Manual (M).
- In the camera’s menu, set the flash mode to Wireless (WL). This tells the camera to communicate with the off-camera flash.
- The attached flash will automatically switch to wireless controller mode, and “WL” will appear on the flash’s display panel.
- Place your off-camera flash (the remote flash) in wireless remote mode. Make sure both flashes are set to the same channel for communication.
- Position the remote flash within a few meters of the camera and ensure it has a clear line of sight to the controller flash for reliable optical triggering.
- When you take a photo, the controller flash on the camera will send a signal (using a light pulse) to trigger the off-camera flash.
Important Notes:
- The built-in flash of the NEX-6 cannot trigger an external flash wirelessly, you must use a compatible external flash as the controller.
- For radio wireless triggering (which does not require line of sight), you need additional accessories like the FA-WRC1M Wireless Radio Commander and FA-WRR1 Wireless Radio Receiver, along with compatible flashes.
- Always check that both the controller and remote flashes are set to the same channel for proper communication.
By following these steps, you can set up and trigger off-camera flashes wirelessly for more creative lighting with your Sony NEX-6.
Sony NEX-6 Built-in Flash vs External Flash – Which Is Better?
| Feature | Built-in Flash | External Flash |
| Power | Less powerful, suitable for close-up shots | More powerful, better for larger areas or distant subjects |
| Control | Limited control over flash strength and angle | Full control over flash output, angle, and zoom |
| Portability | Compact and convenient, always attached to the camera | Larger, requires separate carrying and setup |
| Light Quality | Harsh light, can cause shadows and red-eye | Softer, more adjustable light for natural results |
| Range | Short range, works best in small spaces | Longer range, can cover larger areas or subjects farther away |
| Customizability | Limited, no options for changing light direction | Flexible, can be tilted, rotated, and diffused |
| Battery Life | Uses camera’s battery, drains it quickly | Uses its own battery, lasts longer than built-in flash |
| Cost | Free, included with the camera | Additional cost for the flash unit |
| Use for Creative Lighting | Basic use, limited in creative setups | Perfect for off-camera flash, creative lighting setups |
| Ease of Use | Very easy to use, no setup required | Requires setup, more learning but offers better results |
Sony NEX-6 Flash Compatibility – Which External Flashes Work Best?
The Sony NEX-6 works with many external flashes, both from Sony and other brands. Below is a simple guide to help you choose the right one.

Sony Flashes (Best Match for the NEX-6)
Sony flashes work the best with the NEX-6. They support TTL (auto flash control), wireless flash, and high-speed sync. Here are some top Sony options:
- HVL-F20M: Small and light. Easy to carry and use for everyday photos. Not very powerful but good for close shots.
- HVL-F32M: Medium-sized with more power. It can tilt and turn to bounce light and works well for events and portraits.
- HVL-F43M / F43AM: Brighter and has advanced bounce and wireless features. Good for serious photography.
- HVL-F60M / F60RM / F60RM2: High-end flashes with lots of power and pro-level features.
Other Compatible Sony Flashes:
Models like HVL-F20AM, HVL-F28RM, HVL-F45RM, HVL-F58AM, and others also work. Some older flashes need a Sony ADP-MAA adapter to fit the NEX-6’s hot shoe.
Third-Party Flashes (Budget Options)
If you want to save money, some third-party flashes work well too. These are great for beginners or casual use:
- Meike MK320S: Small, cheap, and supports TTL. It can tilt/swivel and even do high-speed sync. A nice match for the NEX-6.
- Neewer and Yongnuo – These brands offer manual flashes that work well for learning or off-camera use. Not all support TTL, but they’re affordable.
Tip:
For best results, always check if the flash supports the Multi Interface Shoe, which the NEX-6 uses. If you’re using an older Sony flash with a different mount, you may need an adapter.
FAQs:
Can I use an external flash with the Sony NEX-6?
Yes, the Sony NEX-6 can use an external flash. You can put a flash on top of the camera using the built-in flash slot. Sony flashes like HVL-F20M or HVL-F32M work very well. Some cheaper brands like Meike or Neewer also work, but you may need to adjust them by hand.
Which external flashes are compatible with the Sony NEX-6?
Sony branded flashes like HVL-F20M, HVL-F32M, HVL-F43M, and HVL-F60M work best. Some third-party flashes like Meike MK320S also support TTL and manual modes.
Can I trigger off-camera flash wirelessly with the built-in flash?
No, the built-in flash on the NEX-6 cannot act as a wireless commander. You need a compatible external flash attached to the camera to trigger off-camera flashes wirelessly.
Does the Sony NEX-6 support TTL metering with external flashes?
Yes, the NEX-6 supports TTL (Through-The-Lens) flash metering with compatible Sony external flashes and some third-party TTL flashes.
What is Flash Exposure Compensation and how do I use it?
Flash Exposure Compensation lets you brighten or darken the flash output without changing other exposure settings. It can be adjusted in the camera menu when using the built-in or compatible external flash.
Conclusion:
Using flash with the Sony NEX-6 is a great way to improve your photos, especially in low light. The camera has a built-in flash for quick shots, and it also works with many external flashes for more control and better lighting. Whether you’re using auto mode, trying different flash settings, or going wireless with off-camera flash, the NEX-6 gives you plenty of options. Just pick the flash that fits your needs and start experimenting to get the best results in any lighting situation.